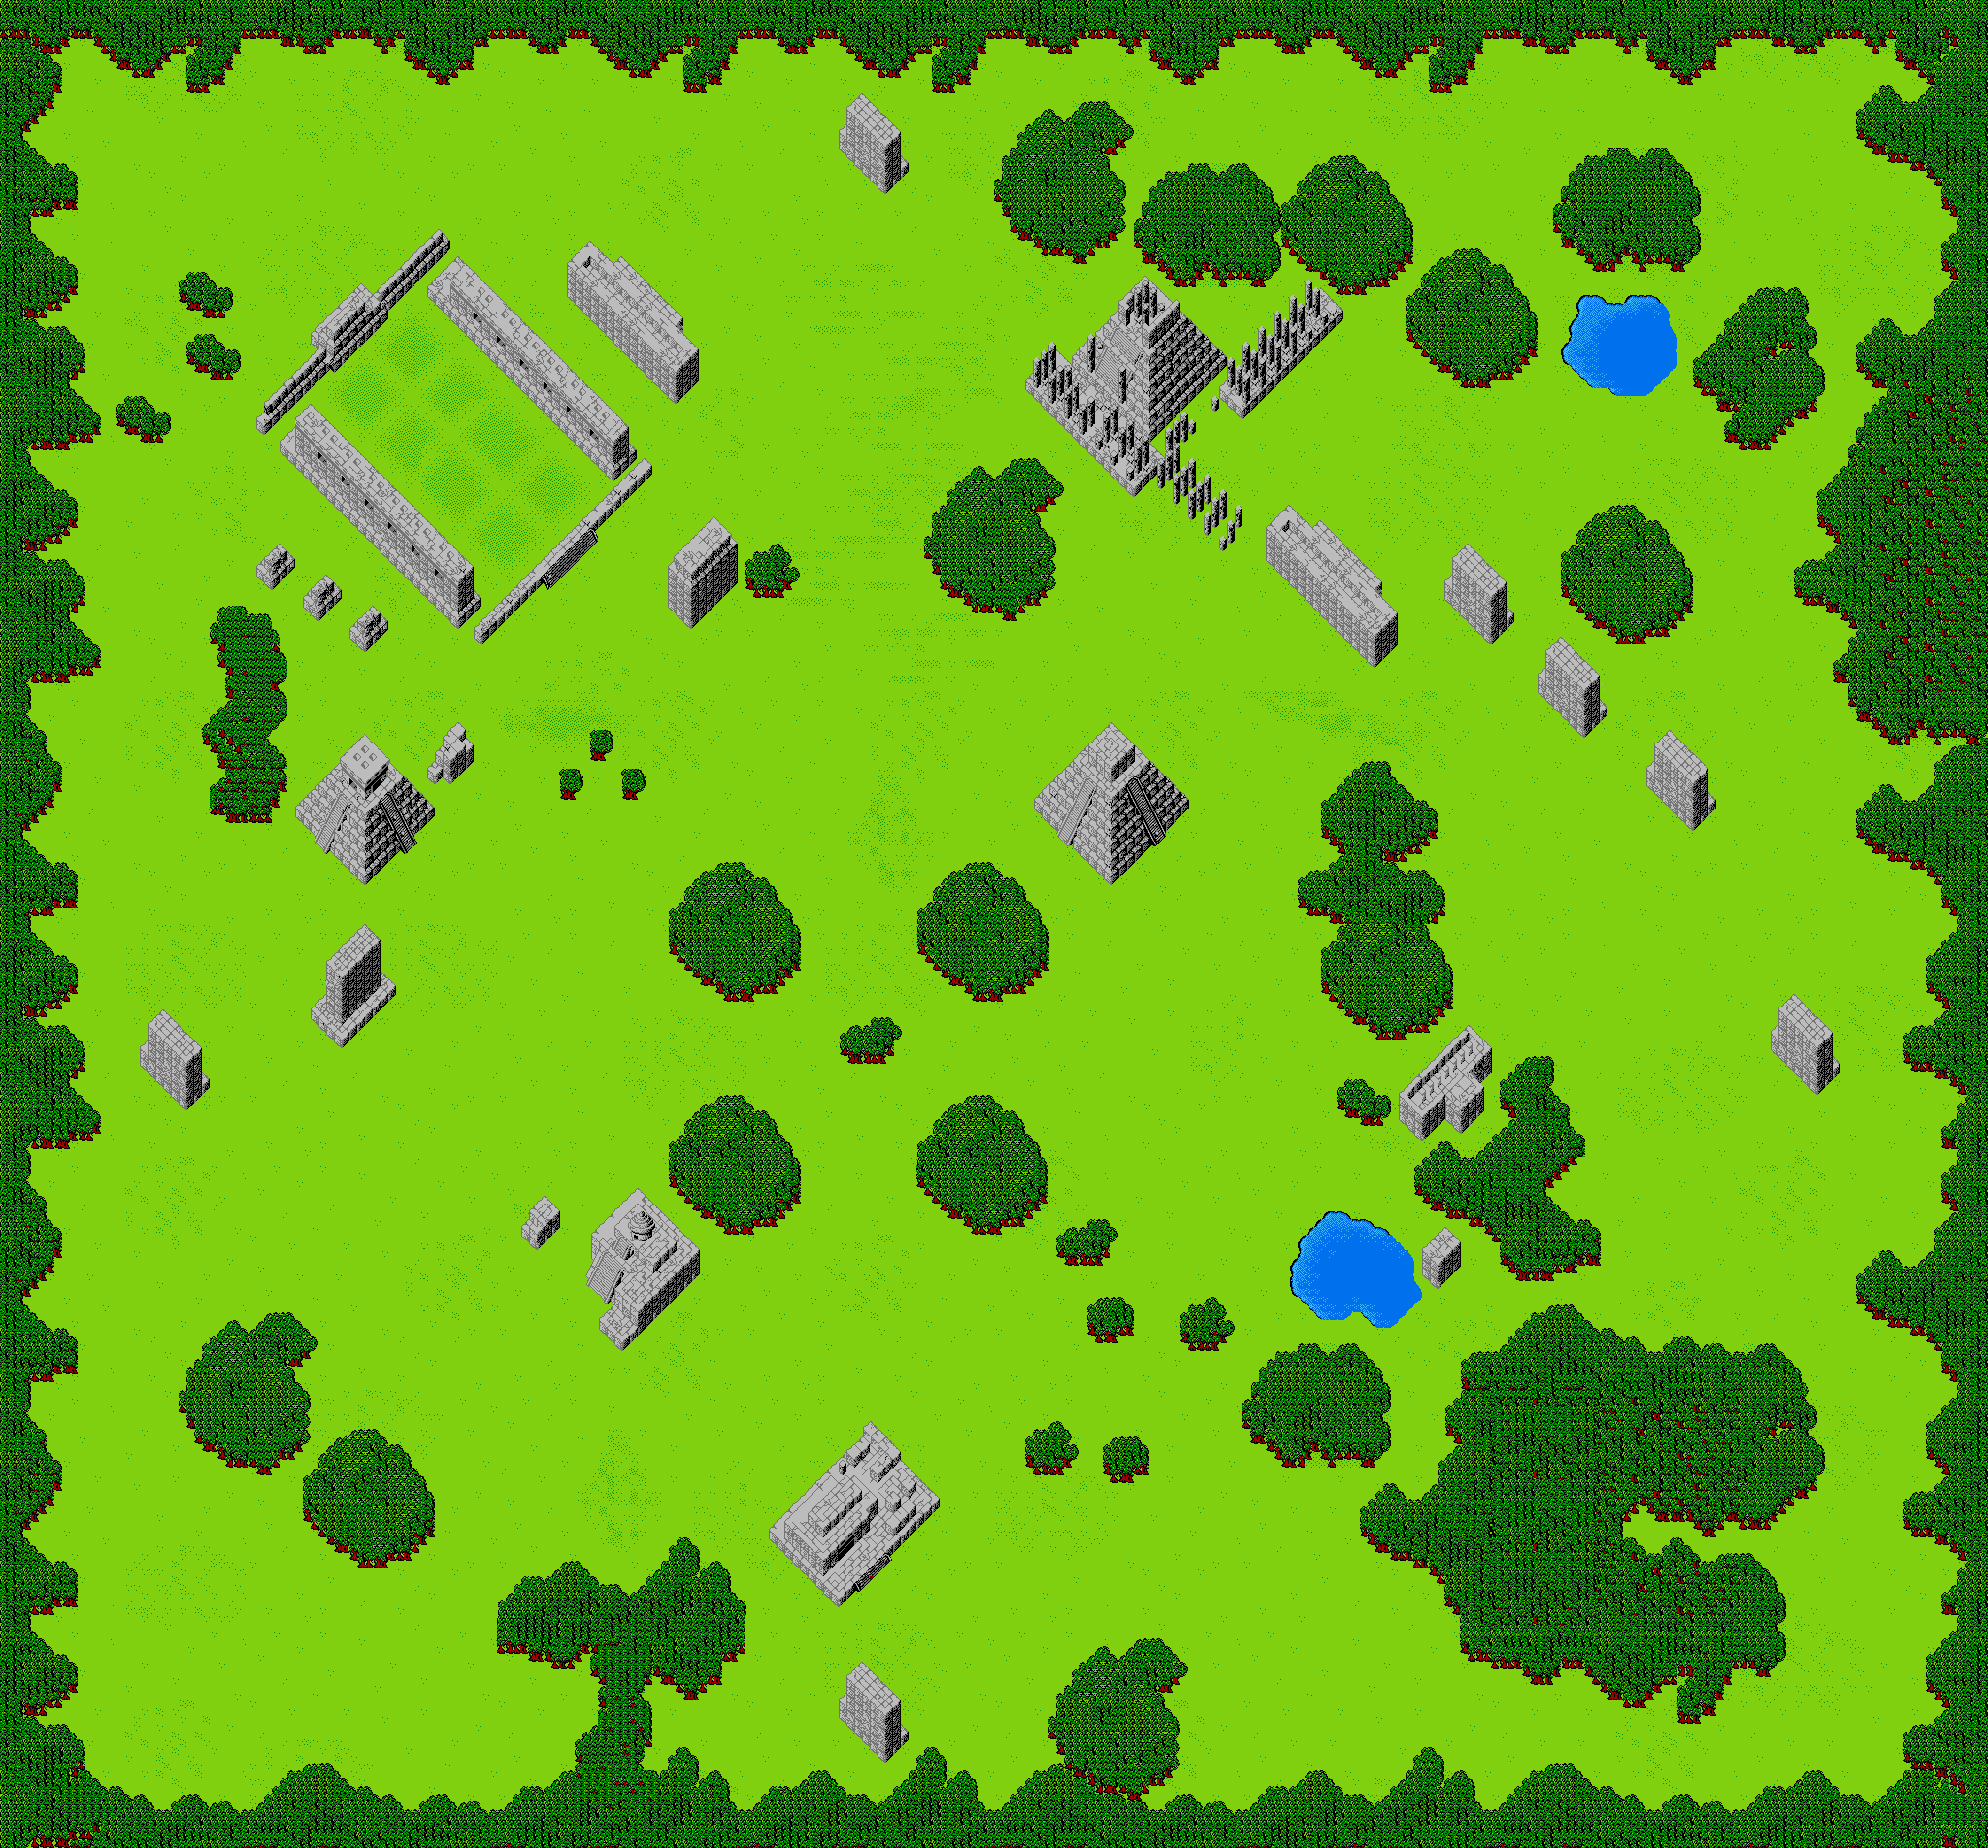
Tombs & Treasure Walkthrough
Maps
The Walkthrough
Laboratory
Your adventure starts in the laboratory, do anything and the Secretary will explain the events so far.
Take the Sword.
Take the Lighter.
Take the Silver Key.
Look at the Notebook to read it.
Go backwards to meet your guide Jose. Talk to him then go forward to leave.
Nunnery
Travel to the Nunnery.
Take the Ixmol Jewel from the statue on the left. Look at the Ixmol Jewel at any point to receive a password.
Tomb of Hi-Priest
Go to the Tomb of the Hi-Priest.
Skorpor will attack. Use the Sword and fight Skorpor (if you don't first use the sword you'll fight bare-handed).
Switch to Jose. Have Jose push the wall on the right. A passage will open leading to the tomb.
Take the Mosaic Tile to open the coffin.
Take the One-eye Mask from the skeleton.
Castillo Pyramid
Upon entering Castillo Pyramid, Two-beak will attack. Use the Sword and fight Two-beak.
Go forward. Place the Mosaic Tile in the hollow.
The passage will open into a new room.
Take the Silver Globe from the headless statue.
Take the Gold Mirror from the floor.
Take the Gold Stand from the floor.
Take the Shallow Bowl from the floor.
Smash the Tall Flask to find the Ring of Itza.
The female character will automatically put on the Ring of Itza.
Look at the flask to find the Iron Rod inside.
Move the pile of gold in the corner to reveal the Red Jewel.
Look at the stone box on the floor. You will not be able to read the tablets inside.
Join the Red Jewel and the One-eye Mask to read the tablets.
Well of Paradise
Wash the Golden Mirror in the water.
The Golden Pipes will be found at the bottom of the well, take them.
Join the Bandage and the Golden Pipes. The Golden Pipes can now be played by the female character.
El Caracol
Snake Master attacks when you enter El Caracol.
Join the Red Jewel and the Sword. Use the Sword and fight Snake Master.
Place the Silver Globe on the pedestal in the center of the room.
Switch to the female character and use the Golden Pipes.
After playing the Golden Pipes a light will shine from the Silver Globe. This light points to a column in the Court of Columns.
Court of Columns
El Slug attacks when you enter the Court of Columns. Yes, that is what they named this enemy.
Join the Red Jewel and the Sword. Use the Sword and fight El Slug.
Look at the column with the light shining on it.
Smash the ground next to the lit column.
The Golden Globe will be revealed, take it.
El Caracol
Take the Silver Globe off the pedestal.
Place the Golden Globe on the pedestal.
Switch to the female character and use the Golden Pipes.
A light will now shine from the Golden Globe and point to a column in the Court of Columns.
Court of Columns
Look at the column with the light pointing to it.
Smash the ground to find the Silver Head. Take the Silver Head and leave the Court of Columns.
Castillo Pyramid
Return to Castillo Pyramid, go forward.
Place the Silver Head on the headless statue. A passage will open up.
Go down this newly discovered passage.
Look at the Stone Box, you will find the Incense inside.
Take the Small Flask from the corner.
Take the Large Flask.
DO NOT TAKE
THE SILVER HEAD WHEN YOU LEAVE CASTILLO PYRAMID!
El Caracol
Take the Golden Globe off the pedestal.
Change to Jose. Push the pedestal.
A passage with stairs opens. Go up the stairs.
Place the Golden Globe on the pedestal.
Wait until light shines through the window and reflects off the Golden Globe.
The light will point to a brick on the wall.
Look at the brick.
Smash the brick that's lit. You will find the Crystal Key inside.
Take the Golden Globe off the pedestal.
Place the Gold Stand on the pedestal.
Place the Golden Globe on the Gold Stand.
Switch to the female character.
Use the Golden Pipes.
Look at the illuminated brick.
Smash at the illuminated brick.
Take the Censer and move back.
Temple of Warriors
Cadaver attacks when you enter the Temple of Warriors.
Join the Red Jewel and the Sword. Use the Sword to fight Cadaver.
Take the Sun Necklace from the statue. Take the Blue Jewel from the head of the jaguar statue.
The jaguar statue turns into a real jaguar.
You are not strong enough to fight the jaguar, retreat by moving backwards.
Well of Paradise
Wash the Sun Necklace in the Well of Paradise.
After washing the Sun Necklace it begins to glow, allowing you to tell the time.
Temple of Warriors
Return to the Temple of Warriors when the Sun Necklace is red, the jaguar will then be gone.
Look at the hole in the wall, behind where the jaguar statue was.
The Iron Key is hidden in this hole.
Use the Small Rod to retrieve the Iron Key.
Wait until the Sun Necklace changes color.
The jaguar will reappear.
Switch to the female character and use the Golden Pipes.
The jaguar will return to statue form.
You can now safely take the Blue Jewel from the jaguar statue.
Ball Court
Hornskull will attack when you enter the Ball Court.
Join the Blue Jewel and the Sword. Fight Hornskull.
Move forward. Take the Blue Block on the wall.
A passage will open after taking the Blue Block. Do not go in the new room, instead head back to the Tomb of the Hi-Priest.
Tomb of the Hi-Priest/Ball Court
Look at the skeleton.
Move the skull, a keyhole will be revealed. Use the Iron Key in the keyhole.
The coffin will slide, revealing a passage.
Go down the stairs into the underground maze.
Join the Small Rod and the Shallow Bowl to create a compass. Use the Shallow Bowl to find your way through the maze.
You will emerge in the Ball Court.
Take the Akbal Jewel. The passage leading back to the Tomb of Hi-Priest will close.
Go left and back to return to the entrance of the Ball Court. Take the Stone Pawl. The passage leading further into the Ball Court will close.
Castillo Pyramid
Place the Blue Block in the hollow on the floor.
A staircase will open, go downstairs.
Put the Stone Pawl on the shaft.
Change to Jose and move the Stone Handle.
Well of Sacrifice/Castillo Pyramid
The Well of Sacrifice is now empty. Go down the empty well.
The well is too steep for the female character to climb, she will stay behind.
Jose volunteers to stay with her.
After climbing down you are attacked by Venum.
Join the Blue Jewel and the Sword, use the Akbal Jewel and fight Venum.
Move the Right Statue.
Move forward into the tomb.
Use the Golden Mirror on the light.
Look at the coffin.
Use the Crystal Key to open the coffin.
Take the Two-eye Mask from the body.
Go through the door revealed by the mirror, it leads to Castillo Pyramid.
Go up the stairs. You can take the Silver Head if you don't plan to come back, but it serves no further purpose.
Well of Sacrifice
Return to the Well of Sacrifice.
Jose is unconscious on the ground.
Look at Jose and he will start to recover.
Look at Jose again and he will explain that the female character has been taken to the Ball Court.
Tomb of the Hi-Priest/Ball Court
The entrance to the Ball Court was sealed after taking the Stone Pawl so you must use the passage under the Tomb of the Hi-Priest.
Go down the stairs under the tomb.
Use the Shallow Bowl to navigate the maze.
The maze ends in the Ball Court, go left.
Go forward.
Join the Red Jewel with the Two-eye Mask.
Join the Blue Jewel with the Two-eye mask.
Use the Two-eye Mask to see a white block.
Move the white block.
A secret door opens, go left.
Tezcat attacks when you enter this room.
Join the Blue Jewel with the Sword. Fight Tezcat.
Use the Large Flask and Scareface appears. Use the Akbal Jewel before fighting him.
After winning the fight you will obtain the Ring of Itza. Drink the Large Flask at night and you will shrink. Go forward to enter the Temple.
Use the Silver Key on the keyhole to unlock the Temple.
Go backwards and drink the Small Flask to return to normal.
Open the now unlocked Temple with the move command.
Take the Sun Key and you will be automatically transported to the Shrine of Tentacula.
Shrine of Tentacula
When you enter the shrine the female character will be unconscious on a stand.
Do anything and Tentacula will attack.
Fit the Blue Jewel in the Sword.
Use the Akbal Jewel.
Then use the Ring of Itza and fight Tentacula.
Look at the stand.
Look at the female character.
Put the Censer on the floor.
Put the Incense in the Censer.
Use the Lighter to light the Incense.
The female character will regain consciousness.
Use the Sun Key on the keyhole in the stand.
The end.
Related