Probably the only Splash Lake guide on the internet


Probably the only Splash Lake guide on the internet

As far as I can tell, there are no other Splash Lake guides on the internet. That's a shame. This is a fun oddball game for the TurboGrafx-16 CD / PC Engine CD. I assume it doesn't get a lot of coverage because it goes for some stupid amount on eBay. I bought it for $4.99 on clearance in 1996 so I guess I'm stuck making this guide.

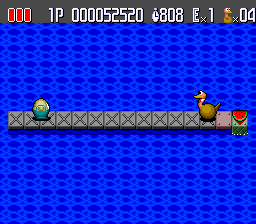
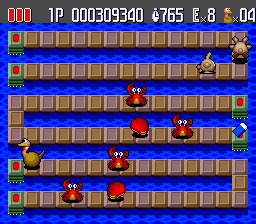
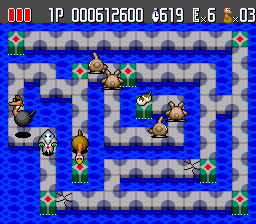
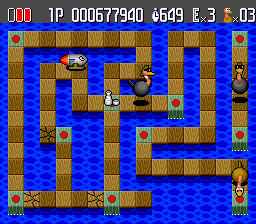
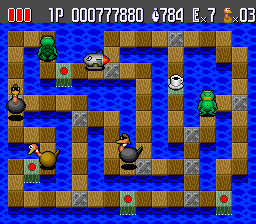
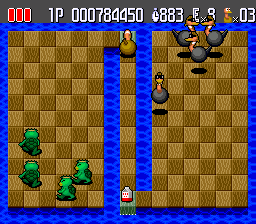
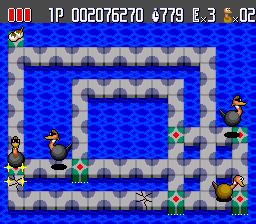
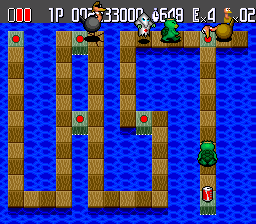
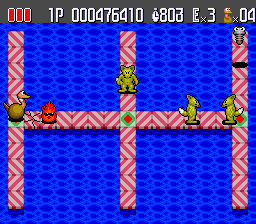
I'm not going to spend much time explaining the controls because they're simple - move the ostrich with the d-pad, peck with one button, jump with the other. You only move one block at a time, jumping clears one block. Pecking is used to crack bricks, a chain of un-anchored bricks will sink. That's how you take out enemies. You're controlling an ostrich not a goose so you can't swim. The game prevents you from accidentally navigating into water via the d-pad but you can jump into it or sink yourself.

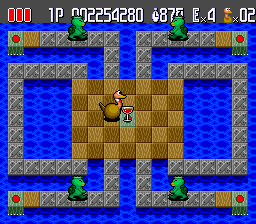
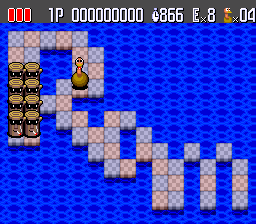
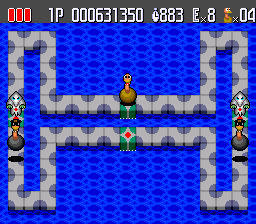
The different enemy and tile types will be explained as we go along.

The basic strategy is to try and sink all the enemies. Alternatively you get credit for clearing a level if you survive until the timer ends. In some levels there is no way to finish other than waiting out the timer. This guide will offer at least some minimal tips for each level.

The main goal of this guide is to show how to unlock all the bonus levels. There are 60 levels in the beginning of Splash Lake with 120 more that can be unlocked by finding hidden items.


Items

Also proof that I wasn't joking about paying $4.99 in 1996 for Splash Lake. There will be a higher-res version of this available whenever I get around to creating a "Receipt Pr0n" section on this site.


Unlocking Bonus Levels

Items

On each level there is a hidden item that is uncovered by pecking an unbreakable tile. There are a couple different unbreakable tile types but only the ones with a red center come into play for hidden items. You'll know you found the right tile when you hear a little chime. After a couple hits a bonus item will appear, usually on a different red center tile.

All the screenshots in this guide have the player next to the tile that uncovers the item and also the item itself. Well, just for the 120 levels with items.

Defeating all the enemies on the level is not required. You can collect the item and let time run out. On the main menu there's a screen to track all the items you've collected.


Rev

If you collect all the items on the regular levels, the Rev. levels will be unlocked. The Rev. levels are more challenging overall than the original levels.


NG

If you collect all the items on the Rev. levels, the NG levels will be unlocked. There are no items to collect on the NG levels. These levels range from comically easy to nearly impossible.


Regular Levels

Level 1-1

Level 1-1

There's only one tile you can search so this starts off easy enough. Peck that tile a couple times to uncover the cherries on the same tile. Then take out the enemy by breaking any other tile before they reach you. Make sure you're on the side connected to the unbreakable tiles.

These first few levels do a really nice job of teaching the mechanics without a boring tutorial.


Level 1-2

Level 1-2

Second level, same deal - hit the only tile you can, collect the fruit, and sink the enemy.

Oh, let's explain these rabbit enemies... they move slowly and don't really follow you. You can hop over them easily if you're coming at them head-on.


Level 1-3

Level 1-3

This game really eases you into things - on level 3 you learn how to handle tiles that are anchored on both sides. It's easy enough to trap the enemies here.

Hit the tile on the bottom-left corner to unlock the orange on the bottom-right tile.


Level 1-4

Level 1-4

This level requires a little speed to get the hidden item. Hop over and tap the tile on the right. Then sink all the enemies. You'll have a couple seconds before the level changes to quickly reach the lemon.

This level introduces two new enemies but let's save their descriptions for later as your encounter with them will be brief for now.


Level 1-5

Level 1-5

These little pudgy shark are slow but kind of annoying because they are programmed to go toward you. They only turn around after hitting an edge though. So you can hop over them and they won't come back around right away.

On this level you also learn that the X tiles are unbreakable but can sink.

As for the hidden item, there's only the one tile to work with.


Level 1-6

Level 1-6

Hit the bottom left tile to reveal the fruit in the top right tile. This level is very easy, just break the four tiles connected to the unbreakable tiles.


Level 1-7

Level 1-7

Hop over the enemies to make it to the only tile you can search. Then it's just a matter of sinking them all at once.


Level 1-8

Level 1-8

The secret tile is in the bottom left corner and the prize is in the upper section.

This is the first level where you really deal with the monkey enemies. They sort of follow you but not too aggressively. After a few steps they stop and may change direction. They are not difficult to deal with.


Level 1-9

Level 1-9

Again the secret tile is in the bottom left corner. The lime I guess is in the center. This level is also pretty easy.


Level 1-10

Level 1-10

The first boss fight is against a guy I'll call "Turtle King". He probably has a name in the manual but I'm too lazy to check. After sinking him he re-spawns on one of the unbreakable tiles. You have to sink him three times in all.

Hit the tile along the right edge to unlock the strawberry in the center.


Level 2-1

Level 2-1

Now we're introduced to the snake enemy which works like the snakes in the original Legend of Zelda. They pace back and forth until they spot the player then they charge. You'll have to learn the timing to hop over them.

The secret tile is the right one in the middle section with the prize in the top right corner.


Level 2-2

Level 2-2

Another new enemy - the smoking log. They don't move so they're easy to deal with.

There are two unbreakable tiles - hit the one on the right to unlock the prize on the left one.


Level 2-3

Level 2-3

You'll have to master the snake jump timing on this level. Make your way over the right side to unlock the prize on the left side.


Level 2-4 (a)

Level 2-4

This is one of the harder levels to get the secret item on. If you venture onto the right side of the level you'll be swamped with enemies.


Level 2-4 (b)

Level 2-4

The best strategy is to immediately sink the enemies then move as fast as you can to hit the left block and collect the carrot on the right block before the level changes.


Level 2-5

Level 2-5

Hit the bottom right tile to get the prize on the bottom left tile. Otherwise this is kind of a rehash of 2-3.


Level 2-6

Level 2-6

You start at the top and have to work your way down to the only unbreakable tile. After collecting the prize, break the nearest tile. Make sure the snake is moving away from you at the time or they'll be stranded on the tile with you. That is a great way to die just before the level changes.


Level 2-7

Level 2-7

There's a lot of travel involved in getting the secret item here. Make your way over to the right side and hit the lower tile. Then backtrack to the left side and collect the prize. Clearing the enemies is easy but those logs are really in the way.


Level 2-8

Level 2-8

Hit the right tile and grab the prize on the left side. Try to avoid luring the snakes to the top of the screen.


Level 2-9

Level 2-9

If you're actually trying to play through this game then this is the point when you'll start to thank me for this guide. Levels like this are really annoying when it comes to searching for items. The magic tile is in the 3rd column from the left. The pepper is at the top of the rightmost column. Clearing the level is just a matter of mastering the jump timing.


Level 2-10

Level 2-10

Boss number two is a centipede that you have to sink all at once. If one pixel is on dry land they won't sink. There are a few spots on the grid that work.

The magic tile is on the right side of the lowest segment and the item is in the center.


Level 3-1

Level 3-1

These rolly guys are really annoying. They chase after you and change direction often. It's easy to get trapped between a couple of them.

The left tile in the center segment is the one to hit and the prize is just a few steps to the right.


Level 3-2

Level 3-2

Another new enemy - the crab. They move quickly from left to right but very slowly up and down. Use that second part to your advantage.

To get the item you have to work your way down to the bottom segment and hit the top tile. Then backtrack to the middle segment to get, an eraser? Sure, that seems right. We're in the school supply portion of the game.


Level 3-3

Level 3-3

The magic tile is on the left and the item is on the right. The only way to clear this level is to break the sets of four bricks around the three anchors. Make sure neither of the rolly guys is on an anchor when you break the last tile.


Level 3-4

Level 3-4

This is a more difficult level than it appears. Finding the hidden item is easy of course. The tricky part is not getting stuck between the rolly guys.


Level 3-5

Level 3-5

Now we're introduced to the the frog enemies. They move around aimlessly and occasionally stop to fire a slow-moving projectile. They don't seem to target you and aren't difficult to deal with.

As for the hidden item, hit the lower right tile and then hop over to the lower left one.


Level 3-6

Level 3-6

Hit the far right tile to unlock the prize on the far left. There isn't much to beating this level otherwise.


Level 3-7

Level 3-7

On this level a number of enemies spawn over time and you have little room to work with. It's a little frustrating but not exactly difficult.

The magic tile is in the top left corner and you have to go all the way down to the bottom right corner to collect your prize.


Level 3-8

Level 3-8

Hit the far left tile to reveal the prize on the far right tile.

You can try to sink the entire board at once, but with how slow the frogs move it's faster to take them out one at a time by breaking two adjoining tiles.


Level 3-9

Level 3-9

There are only two tiles to search, the lower one is the magic tile and the upper one has the prize. Unlike this picture, it's easier if you take out a few enemies first.


Level 3-10

Level 3-10

The next boss is a bird who leaves droppings all over the place. They stay on the screen for a few seconds and will damage you if you touch them. Like the turtle boss, you have to sink him three times. The first two times he will flap and hover until the bricks re-appear. I guess that wears him out and the third time he's done.

Hit the center tile to get the prize in the bottom right corner.


Level 4-1

Level 4-1

Now we're on to candy world where we meet the annoying spring guy. He hops over a tile with each move usually. He can cross gaps and sometimes escapes before being sunk. If you can figure out the timing you can cross under him when he's jumping. He also chases you and is generally a complete pain. Get used to him because he's about to start appearing a lot.

Bottom left corner -> top right corner.


Level 4-2

Level 4-2

Another new enemy - the snail. They move slowly (of course) making them hard to jump over. They also use their magical snail slime to seal any cracked bricks they cross.

The bottom right tile reveals the prize in the center top area.


Level 4-3

Level 4-3

The top left corner has the magic tile and the prize is on the bottom right.

As for strategy - the spring guys are super annoying. The best approach is to get over to one of the long segments and sink them when they follow you. There's almost no chance to sink them on the shorter segments.


Level 4-4

Level 4-4

Another new enemy - the flame. It travels quickly along edges and won't cross a cracked tile. They can be trapped through this limitation but you can also get them stuck next to you because of it.

One cheap way to defeat the flames is to box yourself in on a safe tile and wait out the timer.

Hit the bottom right corner to reveal the hidden item on the bottom left side.


Level 4-5

Level 4-5

Hit the tile on the bottom right corner and collect the prize on the top left corner.

This level is tricky because once you break a tile it blocks the path for the flames. As the space they move in shrinks it gets much more difficult to dodge them. Of course this level can be cleared very cheaply by camping out on a solid tile surrounded by cracked tiles.


Level 4-6

Level 4-6

The center section along the bottom has the tile to hit with the prize along the top. It's easy to keep the flames out of the center area and box them into sections along the top.


Level 4-7

Level 4-7

This might be the first flame level where you seriously consider taking the cheap route of waiting out the timer. The prize is in the top left corner and magic tile in the top right.


Level 4-8

Level 4-8

This is a pretty basic level. There's some backtracking because the tile to hit and prize are on opposite sides.


Level 4-9

Level 4-9

Hit the top right tile to earn the prize in the center. At a glance it looks like you could sink this whole level at once but that's not the case. Instead you have to carve out smaller sections.


Level 4-10

Level 4-10

Next boss - the three wolves. It's some demented fairy tale variant. You have to sink all three at the same time. Any fewer and they just re-spawn. This is a tough boss to defeat since they all move independently.

Hit the bottom left tile and collect the item in the center.


Level 5-1

Level 5-1

This level you can beat by sinking everything at once. The bottom right corner has the tile to hit and the prize is in the top left corner.


Level 5-2

Level 5-2

Geez, there are 120 levels with items and I'm already burned-out on describing them. From now just look at the pictures for where everything is. See in this one the ostrich is facing the magic tile and you can see where the corn dog appears.

This is another "sink everything at once" level.


Level 5-3

Level 5-3

By now there are two new enemies to fend off. The ghost randomly appears and disappears, usually somewhere semi-close to the player. It can only be sunk when it is completely solid. You'll rarely get hit by them but they're also tough to defeat.

Then there's the rocket, my second least-favorite enemy behind the springy guy. They move fast and chase the player. Any level that they're on you'll want to take them out first. They can knock three hits down in a couple seconds.


Level 5-4

Level 5-4

This level is hard to clear because you can only sink the center section. You need to get the rocket to follow you there then quickly get away before he changes direction on you.


Level 5-5

Level 5-5

This is another one where you win by sinking everything at once. You can jump over that middle section if a rocket chases you.


Level 5-6

Level 5-6

This is a tough level to collect the prize on because with these short rows the rocket can hit you three times quickly. Try to take it out first then go corner to corner for the item.


Level 5-7

Level 5-7

I hope you appreciate how long it took to get a screenshot showing the magic tile and prize locations. I don't know if there's a good strategy to clear this level. You have to break a ton of bricks to setup drops and hope you catch a ghost at the right time.


Level 5-8

Level 5-8

This is an easy level, or at least one where it's hard to get hit by enemies. You move a lot faster than the snails and can break tiles around them before they get away.


Level 5-9

Level 5-9

On this level you have to quickly break two consecutive tiles to knock out the approaching rockets. The ghosts again require some luck to defeat.


Level 5-10

Level 5-10

Next boss - the evil ostrich. They have all the same ostrich powers as you and will sink you. Worse though is they have the reflexes to escape tiles a frame before they sink. The only way to sink them is to leave them no space to escape to.

This screenshot not only shows where the item is, but one of the few spots the evil ostrich can be sunk from. If you sink that whole section on the left while they are along the left edge, but not close to the top edge, you can defeat them.


Level 6-1

Level 6-1

Now we're at the point where former bosses start appearing as regular enemies. There's a lot of room to move so this level isn't bad. Getting rid of the rocket quickly is of course a good idea.


Level 6-2

Level 6-2

This level is a pain, you have to sink multiple sections at once to trap the evil ostriches. This level is lot easier with two players.


Level 6-3

Level 6-3

Despite the number of rockets this level isn't too bad because you can escape them easily. The hardest part is maybe finding a second to hit the magic tile.


Level 6-4

Level 6-4

This is another level that looks deceptively simple. It seems like dropping the middle section then hoping over and sinking the outer section would clear the entire board. That works if there aren't any evil ostriches that can jump onto the same tile as you. Once that happens you're pretty much trapped. So you have to hit everything at exactly the right time.


Level 6-5

Level 6-5

I never found a really good way to clear this level. The evil ostriches have many places to escape even if you clear a large section of the board. I just grab the item and avoid them until the clock runs out.


Level 6-6

Level 6-6

This should be the last new enemy - giant green blob that spawns smaller green blobs. He doesn't move so you can run around the perimeter and chip away at tiles until you sink the center section.


Level 6-7

Level 6-7

The nice thing about this level is the rockets can't cross onto the lower half of the screen. So you can work on the other three enemies and ignore them for a while.


Level 6-8

Level 6-8

This feels like a survival level, there's not an easy way to sink the two evil ostriches. The top corners are the best spots but it's tough.


Level 6-9

Level 6-9

It's more or less impossible to sink all the evil ostriches in one shot because some will be close enough to jump over. If you sink both sides at the same time you're likely to get an enemy stuck on the center strip with you.


Level 6-10

Level 6-10

The last level isn't the hardest. The evil ostrich is easy to trap in the corner. The mini green slimes will challenge the TurobGrafx-16's sprite limit over time and you'll likely notice some flicker or slowdowns.

OK, that's it for the regular levels. Can I really keep going for another 120...


Rev. Levels

Rev. Level 1-1

Rev. Level 1-1

The Rev. levels have the same items as the original levels. I'm going to continue just using screenshots to show where the special tile and prize are.

In terms of difficulty they are about the same as the regular 6-X levels on average. There are a few where they ramp it up though. Level 1-1 immediately starts with boss enemies. The advantage you have over the enemies here is being able to cross the two sides.


Rev. Level 1-2

Rev. Level 1-2

This level isn't too hard either, they just throw a ton of enemies at you. My advice is to take out the weaker ones first then work away at the turtle king last.


Rev. Level 1-3

Rev. Level 1-3

This is another easy level because there are several places to trap enemies.


Rev. Level 1-4

Rev. Level 1-4

This is another level you can clear all at once. You can sink the entire board 2-3 tiles left of the magic tile and have enough time to hit it before the level changes.


Rev. Level 1-5

Rev. Level 1-5

This is just a harder version of Rev. 1-3.


Rev. Level 1-6

Rev. Level 1-6

I never figured out a strategy for sinking the center section. Instead I let enemies follow me into the bottom or side strips.


Rev. Level 1-7

Rev. Level 1-7

The only difficulty with this level is finding room to move. There are a lot of enemies and no place for them to go.


Rev. Level 1-8

Rev. Level 1-8

If you want to be cheap you can camp out in the middle until the timer expires - the item is conveniently located there already.


Rev. Level 1-9

Rev. Level 1-9

Finally, a level that just tells you where the item is. Camping out on the smaller island until time runs out works here too if you're feeling lazy.


Rev. Level 1-10

Rev. Level 1-10

This is another one where your best plan is taking out the weaker enemies first so they get out of the way.


Rev. Level 2-1

Rev. Level 2-1

The Rev. Level 2-X stages all have snakes, sorry to anyone with a phobia. Most of these stages don't require any special strategy. In this one the layout of the board gives you a huge advantage.


Rev. Level 2-2

Rev. Level 2-2

This one is also easy if you have the timing down to jump over a charging snake. Just to avoid any confusion, the lower tile is also the one to hit.


Rev. Level 2-3

Rev. Level 2-3

The outer corridor is a great location to trap enemies on this level.


Rev. Level 2-4

Rev. Level 2-4

This is a tough level to get the item on since your first instinct will be to sink the board as quickly as possible. After grabbing the item you should try to lure the snakes to the top or bottom of the board so they don't charge you when you're trying to break tiles.


Rev. Level 2-5

Rev. Level 2-5

The centipede is easier to sink on this level than the first time they appear. The position they're in on this screenshot is one great location to trap them.


Rev. Level 2-6

Rev. Level 2-6

This level is easy but annoying because the smoking logs are in the most inconvenient places.


Rev. Level 2-7

Rev. Level 2-7

When the centipede is on the left side this level is easy to finish.


Rev. Level 2-8

Rev. Level 2-8

This is another deceptive level. It looks like you can take out the entire bottom section by breaking two tiles but there are more anchors to deal with. I usually sink one of the logs then let the centipede wander into one of the side columns. I say "usually" as though I play through Splash Lake all the time. Writing this guide constitutes my second and likely final 100% play-through.


Rev. Level 2-9

Rev. Level 2-9

This is a lot like Rev. 2-5 except there are fewer gaps you can jump.


Rev. Level 2-10

Rev. Level 2-10

It's tough to trap the centipede on this level. If you're feeling cheap you can deal with the enemies on the top section, hop down to hit the magic tile, go back to grab the prize, and then wait out the timer.


Rev. Level 3-1

Rev. Level 3-1

The difficulty starts to increase a bit with the next set of levels. The layout on this one gives you very little space to work. It's kind of a pain to get the item on this level due to the zig-zag paths.


Rev. Level 3-2

Rev. Level 3-2

This is the easiest in this set of levels, the crabs are simple to trap and you have a dozen ways to avoid them.


Rev. Level 3-3

Rev. Level 3-3

This level is harder than it looks - enemies keep spawning and when you sink tiles you also create a dead end to get trapped in.


Rev. Level 3-4

Rev. Level 3-4

The tough part about this level is avoiding the projectiles because they come from every direction it seems. If you take it slowly you shouldn't get hit much.


Rev. Level 3-5

Rev. Level 3-5

I'm not a fan of this level. You'll want to try to sink all four sides immediately but that always traps enemies with you. Having more than one section sunk at a time drastically increases the difficulty of this level.


Rev. Level 3-6

Rev. Level 3-6

This level is really annoying too. I went with hoping down to the tile with the prize, cracking the block below it, then jumping to the right and sinking enemies when they followed me there. This approach takes forever though.


Rev. Level 3-7

Rev. Level 3-7

There's a lot going on in this level and I don't have an awesome strategy. You again have the advantage of being able to hop across gaps to avoid enemies or setup traps.


Rev. Level 3-8

Rev. Level 3-8

Another deceptive level - it looks like you can sink the entire board but it takes a lot of time to set that up. Sinking the entire left or right side isn't hard though so that's my suggestion.


Rev. Level 3-9

Rev. Level 3-9

You have to sink the whole board to clear this level. The key is not doing it when an enemy is on a safe tile or you have to repeat the process. Save one of the corners for last because you can lure all the enemies into an opposing corner then hop across a gap. This at least prevents an enemy from getting stuck on your tile when you sink the board.


Rev. Level 3-10

Rev. Level 3-10

I never cleared all the enemies in this level. You have to sink the birds twelve times and I can't get it done it time. I'm starting to think many of these levels are intended for two players.


Rev. Level 4-1

Rev. Level 4-1

I recommend the cheap approach with this level. Box out the flames, hit the block in the bottom right corner, grab the item in the top left corner (likely getting hit along the way), and then wait it out.


Rev. Level 4-2

Rev. Level 4-2

This level is awful, really awful. Yet it's only the third hardest in the game. The two toughest are coming the NG section, they're about equally tough so this is third by default.

The only way to avoid getting hit is to have the springs jump over you. Once they hit a dead-end their pattern shifts so you need to stay in the longer corridors as much as possible. If you want the item (and you do if you want to unlock the NG levels) then save that tile for last.


Rev. Level 4-3

Rev. Level 4-3

This is only flame level that's kind of fun to clear the right way. You can really control their traffic and box them off into a small space or knock them out one at a time.


Rev. Level 4-4

Rev. Level 4-4

You have to cross the board twice to unlock and grab the item. If you're lucky, or figure out the timing, the springy guy will stay along the bottom row and his AI script won't figure out to chase you back to the top.


Rev. Level 4-5

Rev. Level 4-5

This is a really rough flame level because you can't jump across the gaps. I just grab the item then box myself in until time runs out.


Rev. Level 4-6

Rev. Level 4-6

Hmm.. maybe this is the third hardest level in the game? The larger 'L' is a good place to trap these springy guys. Otherwise you can avoid them until time expires.


Rev. Level 4-7

Rev. Level 4-7

If you can, try to get the springy guy trapped in that top column early. Otherwise keep dodging until you can sink everything at once.


Rev. Level 4-8

Rev. Level 4-8

There's only that one little spot where you have the jumping advantage. As usual, take out the weaker enemies first. Then do a tour of the world to grab the item. With whatever time you have left setup traps and hope you get all three wolves into the same section.


Rev. Level 4-9

Rev. Level 4-9

You're probably supposed to sink the whole board but the snails are really easy to take out one at a time by sinking the tiles they're on before they have a chance to seal them.


Rev. Level 4-10

Rev. Level 4-10

This is like level 4-8 but kind of easier. Well, it's easier to avoid enemies and get the item but harder to trap all three wolves at once.


Rev. Level 5-1

Rev. Level 5-1

Not much strategy to this level other than setting-up traps and waiting for ghosts to appear in the right place.


Rev. Level 5-2

Rev. Level 5-2

Focus on just the bottom left corner here. You can crack the single connecting tile to the right corner then one of two on the center left side, then camp out to break the third tile needed to sink the whole corner.


Rev. Level 5-3

Rev. Level 5-3

This one is easier with two players but a single player can do it, no problem. Get the evil ostriches into the center by breaking one of the outer sections. Then setup each outer section by breaking a tile on one side. Now sink the center section. You have a few seconds before the center section recovers where you can sink the evil ostriches.


Rev. Level 5-4

Rev. Level 5-4

At the start of this level you need to hurry over to the main board before a spawning rocket catches you. It's tough to get the item but if you can get the rockets to follow you into the corridor on the right you'll have time after hopping across.


Rev. Level 5-5

Rev. Level 5-5

The right and left sides should both be prepped to sink two large sections at once. That's about the only way to catch the evil ostriches. Keep in mind they can break tiles too and might sink you while you're setting up a a trap.


Rev. Level 5-6

Rev. Level 5-6

You stand no chance of sinking the evil ostriches in the center so you have to lure them out to the left or right edge. The left side in particular is good for taking them out.


Rev. Level 5-7

Rev. Level 5-7

There's a lot of traveling required to unlock and grab the hidden item. After all that you probably won't have enough time to handle all the enemies.


Rev. Level 5-8

Rev. Level 5-8

We're getting to the point where the game starts being not fun, maybe we're past it already. There are still some good levels coming up but from here on out most of them feel like a grind. You have to use the corners to trap the enemies here. The way the rockets follow you makes that tough.


Rev. Level 5-9

Rev. Level 5-9

You have to get the snails out of the way as quickly as possible or you'll go mad trying to navigate this level. You need to setup multiple sections you can sink at once.


Rev. Level 5-10

Rev. Level 5-10

By comparison, this is easier than the previous level because the top level section is perfect for taking out the evil ostriches.


Rev. Level 6-1

Rev. Level 6-1

I just now realized this board spells "last". I guess because it's the last set of levels? It's not though, there are 60 more levels if you find all the items. At least this time they put the magic tile and item near each other.


Rev. Level 6-2

Rev. Level 6-2

This level is OK if you decide to just avoid the rocket. The item is easy to get as it's on the tile you need to hit. Taking out the evil ostrich is simple for once too.


Rev. Level 6-3

Rev. Level 6-3

This one is also not too rough because the map layout gives you a huge advantage.


Rev. Level 6-4

Rev. Level 6-4

This level again shows a little mercy by making the item appear on the tile you hit. You have to sink the whole board three times to clear it, which is not super easy to do within time.


Rev. Level 6-5

Rev. Level 6-5

I think this is another level that kind of requires two players to finish because you need to drop multiple sections at once to defeat the evil ostriches.


Rev. Level 6-6

Rev. Level 6-6

What you don't see in this screenshot is the stream of spawning enemies that you need to trap one at a time in the columns.


Rev. Level 6-7

Rev. Level 6-7

The right side corners are OK places to trap enemies if you can get them up there.


Rev. Level 6-8

Rev. Level 6-8

This is another level that will test the sprite limit on the system. Most of the top and bottom halves can be sunk which takes care of the blobs. Chances are you'll be fighting the evil ostriches until the time limit expires.


Rev. Level 6-9

Rev. Level 6-9

This is a busy level but you can sink large sections in a short period of time. By just driving up the middle and quickly breaking bricks on the left and right you can clear this board without taking too much damage.


Rev. Level 6-10

Rev. Level 6-10

To sink the green blob you have to be careful not to break consecutive bricks by the anchored tiles. Two in a row will sink so you have to stagger them.


NG Levels

NG Level 1-1

NG Level 1-1

Your reward for collecting 120 items is the NG levels. There are no items on these levels so you can just focus on clearing them. They range wildly in difficulty. Overall they feel like levels the developers created for fun.

This is clearly a level made for fun. It's not very difficult but there are a lot of enemies to deal with.


NG Level 1-2

NG Level 1-2

I assume this shape means something? I dunno. The right side is easier to work with so stay there if you can.


NG Level 1-3

NG Level 1-3

This is an annoying level because the controls don't handle zig-zag shapes well. I don't have any great advice other than to keep an eye on your life bar because you'll get hit easily.


NG Level 1-4

NG Level 1-4

I made no attempt to solve this level. It should be obvious how to clear it, or you can just go grab a coffee while the time runs down.


NG Level 1-5

NG Level 1-5

The "BBS" now makes me think the first four stages are trying to spell out something. Like are the developers advertising a favorite BBS server from the 90s? These are not the initials of anyone listed in the credits so I'll rule that theory out.


NG Level 1-6

NG Level 1-6

There is no way to solve this level other than waiting it out. The two blocks in the top corner are fine for that. Of course you then have to make a break for a safe tile when the timer expires. I also wonder if the shape of this stage is a message.


NG Level 1-7

NG Level 1-7

This is an extremely simple level except for the top left corner.


NG Level 1-8

NG Level 1-8

The center column is the only good place to sink enemies.


NG Level 1-9

NG Level 1-9

I got lazy and cleared the top right section then waited things out.


NG Level 1-10

NG Level 1-10

This is a weird way to end the first set of levels. Just use the middle section to work your way across the board, then hop over to the top center tile and take all the enemies out.


NG Level 2-1

NG Level 2-1

This is another weird one. You can sink the left side immediately then wait for the tiles to resurface and clear the rest.


NG Level 2-2

NG Level 2-2

If anyone out there can translate these boards to English, or confirm that they don't say anything, please email me.


NG Level 2-3

NG Level 2-3

This one I can read. Be careful not to accidentally sink yourself on this stage.


NG Level 2-4

NG Level 2-4

I also didn't try to clear this level because of the center section with the two snakes, no thanks.


NG Level 2-5

NG Level 2-5

There aren't any breakable tiles on this level so you only have one option.


NG Level 2-6

NG Level 2-6

Yeah, no thanks again. I just camped out on that little island.


NG Level 2-7

NG Level 2-7

This one can be cleared but the right side is tough.


NG Level 2-8

NG Level 2-8

This looks like one of the enemies from Night Stalker on the Intellivision.


NG Level 2-9

NG Level 2-9

This is a self-shoutout from level designer Yasunori Takahara who is credited on other games as Yax Takahara (source: https://www.mobygames.com/developer/sheet/view/developerId,178777/)


NG Level 2-10

NG Level 2-10

This is another easy-ish final stage, the snakes are moderately annoying to deal with but that's about the only challenge.


NG Level 3-1

NG Level 3-1

I don't believe this is a reference to anyone on the development team.


NG Level 3-2

NG Level 3-2

I assume this also translates to something and isn't a purely random set of shapes.


NG Level 3-3

NG Level 3-3

Reminder that the TurboGrafx-16 is running an 8-bit CPU.


NG Level 3-4

NG Level 3-4

This level exists solely to torment players that made it this far.


NG Level 3-5

NG Level 3-5

Alright, so we're back to a level that has some minimal degree of strategy to solving. The entire right side of the screen is a deathtrap so keep all the enemies on the left side.


NG Level 3-6

NG Level 3-6

I guess this is another joke-y level. The enemies are on the top section and it's very tough to defeat them in that amount of space. I just waited this level out.


NG Level 3-7

NG Level 3-7

The four corners are tough to sink but the center sections can be blocked off and used to trap enemies.


NG Level 3-8

NG Level 3-8

This is kind of a fun level, the strategy is simple and by now you better be good at jumping over enemies.


NG Level 3-9

NG Level 3-9

This level is pretty basic too, I don't have any special advice.


NG Level 3-10 (a)

NG Level 3-10

Whoever came up with this level is a sadist. There are just too many birds and they move way too fast. You don't realize how fast they are until there are eight of them to avoid. Your only hope is to get really good at jumping because on the solid paths they'll take you out quickly.


NG Level 3-10 (b)

NG Level 3-10

The best strategy is to circle around the edge. Not the far edge, the edge with the tiles you can hop over. Try to get them all bunched up like in this screenshot. They'll then chase you around but if you keep jumping you'll stay ahead of them.


NG Level 4-1

NG Level 4-1

I could not clear this level because the sinkable strips are too small to get all three wolves at once. Maybe you'll do better.


NG Level 4-2

NG Level 4-2

As fire levels go this one isn't too rough. You just have to be quick when you reach a corner because if a flame gets to you it'll be a lost life.


NG Level 4-3

NG Level 4-3

This is a lot like Rev. 4-2 but at least you don't have to worry about finding an item. The other "nice" thing about this level is there are a couple places the springy guys can't seem to follow you so you can camp out until the timer runs down. Their AI script tries to get to your x,y position but doesn't think more than one step ahead so they can get stuck in a loop until your position changes.


NG Level 4-4

NG Level 4-4

The only thing to this level is breaking tiles faster than the snails can repair them. It's not too tough.


NG Level 4-5

NG Level 4-5

I made no effort to try and clear this level. One potential approach could be to trap some fire guys into the right-most side then hop across the center to sink them.


NG Level 4-6

NG Level 4-6

There's a very good chance you will rage quit on this level. It's not quite as bad as NG 3-10 though.

It starts with a couple springy guys but more spawn. It's possible to sink them in those two middle strips I guess but I couldn't manage it. Instead turn on turbo fire for the jump button (it's not cheating if it's built into the default controller) and keep moving along the outside tiles. If, if you can get all the springs to follow you in a line then just keep moving until time runs out.


NG Level 4-7

NG Level 4-7

I also made no effort to solve this level. If I did I'd start by breaking the two left-most tiles and working across the center in an attempt to sink the whole board at once.


NG Level 4-8

NG Level 4-8

This is a boring level, all you can do is keep jumping across the fire guy until time runs out.


NG Level 4-9

NG Level 4-9

If you can take the fire out early then this level is almost winnable.


NG Level 4-10

NG Level 4-10

You can take all the enemies out at once but I dealt with springy guy first.


NG Level 5-1

NG Level 5-1

I think maybe there's another message coming, I wonder what it could be...


NG Level 5-2

NG Level 5-2

There's just not enough space to move around here. You can take out the rockets by breaking two consecutive tiles. The evil ostrich is practically impossible to sink.


NG Level 5-3

NG Level 5-3

This level is not fun even a little. Instead of trying to sink everything at once, sink the first round of rockets by breaking consecutive tiles before the next set spawns.


NG Level 5-4

NG Level 5-4

I think it's obvious what to do here - top, then the lower corners, then the center. Doing the top last is fine too if you remember to stagger the tiles in the center.


NG Level 5-5

NG Level 5-5

The strategy here is to break a tile, hop over a rocket, then sink it when it's on the way back for you.


NG Level 5-6

NG Level 5-6

These letter levels are like a nice little gift from the developers before they throw ten absurd ones at you in the end.


NG Level 5-7

NG Level 5-7

On this level your safest bet is cracking the tiles around the top safe space. Then waiting by the two below it then quickly jumping and hopping to take out any enemies that wandered up there. That second step is like 100x easier with two players.


NG Level 5-8

NG Level 5-8

The rockets make this the only difficult level in these letter stages.


NG Level 5-9

NG Level 5-9

The bottom right of the K is the best place to work here.


NG Level 5-10

NG Level 5-10

It's a good thing they didn't change the title at the last minute. This is one of the easiest levels in the NG set.


NG Level 6-1

NG Level 6-1

Now we're back to crazy levels. I have no idea how you're supposed to have enough time to sink these guys a total of 24 times.


NG Level 6-2

NG Level 6-2

Your biggest problem with this level is the evil ostriches will sink areas you're trying to setup as a trap, often sinking you in the process.


NG Level 6-3

NG Level 6-3

You have to be very careful not to get the evil ostrich stuck on a safe tile with you after breaking the last tile you need to.


NG Level 6-4

NG Level 6-4

This level requires a lot of luck unless you've figured out a way to manipulate where the ghosts appear.


NG Level 6-5

NG Level 6-5

This is the end of good times. You'll finish this level without a challenge and then head for some very challenging ones.


NG Level 6-6

NG Level 6-6

Try to take out the rockets right away. Then it's a matter of getting lucky and having all the ghosts appear at the right time and not on the center tile.


NG Level 6-7

NG Level 6-7

I think the last four stages are all unwinnable without a second player. They each require simultaneously dropping large parts of the map.


NG Level 6-8

NG Level 6-8

I'm 99% sure you have to take out the top left corner and bottom right corner at the same time. This can't be done with one player.


NG Level 6-9

NG Level 6-9

You have to sink all four corners the blob is on and even with two players that's very tough.


NG Level 6-10

NG Level 6-10

This one is also going to require two players to get through. I was kind of expecting something zanier from the last level.


Congratulations! You made it to the end, here's a 1920x1080 wallpaper of the ending screen.

Ending wallpaper


Related